
Do you remember opening your lunchbox as a kid and seeing a brightly wrapped chocolate treat waiting for you? For many of us, the ultimate schoolyard snack was the classic jam-filled marshmallow biscuit.
The soft bite of the chocolate shell, the gooey marshmallow, and that tangy burst of raspberry jam created the perfect mouthful.
But if you have bought one recently from the supermarket, you might have noticed a sad reality. They seem smaller, the chocolate tastes a little waxy, and the jam is barely there.
That is exactly why you need to try making **homemade jammy wagon wheels**. When you bake these in your own kitchen, you control the size, the quality of the ingredients, and, most importantly, the amount of jam.
Let’s look at how you can recreate this iconic, nostalgic snack right at home without pulling your hair out over melted chocolate and sticky marshmallow.
Key Takeaways
Piping is essential: Pipe your marshmallow into a ring shape to create a safe “dam” for your jam.
Cool completely: Never assemble your biscuits while they are warm, or your marshmallow will melt into a sticky puddle.
Quality chocolate matters: Use real chocolate with cocoa butter, not cheap baking melts, for the best snap and flavor.
Patience is a virtue: Chilling the assembled cookies before dipping them in chocolate prevents them from falling apart.
The Anatomy of a Perfect Jammy Biscuit
Before you start pulling out flour and sugar, it helps to understand what makes this treat work. A proper wagon wheel is an exercise in balancing textures.
You need four distinct components working in harmony.
The Biscuit Base
This cannot be a soft cookie. You need a short, crumbly biscuit that holds its shape. Think of a classic vanilla shortbread or a slightly crisp sugar cookie. It needs enough structure to support the heavy toppings but still easily bite cleanly without shattering everywhere.
The Marshmallow
Store-bought fluff in a jar might seem like an easy shortcut, but it is often too runny. Making your own marshmallow using gelatine or agar-agar gives you a bouncy, stable texture. This stability is what keeps the top biscuit from sliding off.
The Jam Center
You want a high-quality raspberry jam. A tart jam perfectly cuts through the intense sweetness of the marshmallow and chocolate. A thick consistency is best so it does not seep into the biscuit and make it soggy.
The Chocolate Shell
This seals everything together. A thin, crisp layer of dark or semi-sweet chocolate perfectly balances the sweet interior. Milk chocolate works too, but it can make the overall snack a bit too sugary.
Step-by-Step: Assembling Homemade Jammy Wagon Wheels
Making these treats requires a little bit of planning. Breaking the process down into manageable steps makes it much easier.
1. Bake the Biscuits First
Start by making a simple vanilla shortbread dough. Roll it out to about a quarter-inch thickness. You do not want them too thick, remember, you are stacking two of them together.
Use a round cookie cutter—about three inches wide is a great size for an authentic feel. Bake them until they are just golden around the edges.
Expert Tip: Transfer the baked biscuits to a wire rack immediately. Let them cool completely. If they hold even a fraction of heat, your marshmallow will melt on contact.
2. Whip Up the Marshmallow
Making homemade marshmallow sounds intimidating, but it is actually just sugar syrup whipped into gelatine.
You will need a candy thermometer to ensure your sugar syrup reaches the soft-ball stage (240°F or 115°C). Pour the hot syrup slowly into your bloomed gelatine while your mixer runs on medium speed. Whip it until it turns thick, glossy, and doubles in volume.
Transfer this mixture into a piping bag immediately. Homemade marshmallow sets up very quickly as it cools.
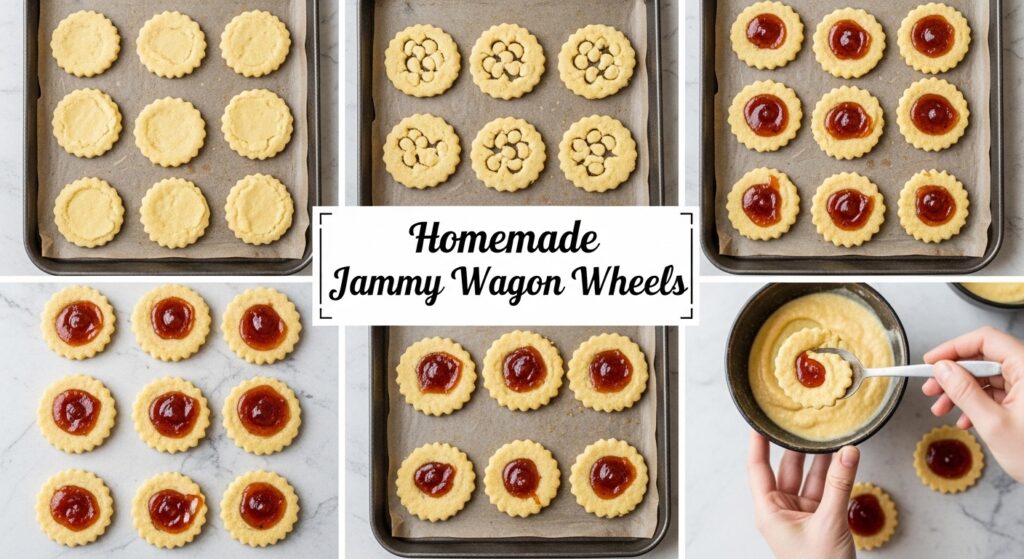
3. Build the Jam Dam
This is the secret to keeping your treat neat. Take half of your cooled biscuits (these will be the bottom layers).
Snip the end off your piping bag and pipe a thick ring of marshmallow around the outer edge of the biscuit. Leave the center completely empty. You have just built a little wall to hold your jam.
Spoon a generous teaspoon of raspberry jam into the empty center. The marshmallow ring stops the jam from bleeding out the sides.
4. Cap and Chill
Pipe a tiny dab of marshmallow right on top of the jam to act as glue. Place your second biscuit gently on top and press down lightly. Do not squash it, just press enough to make sure the top biscuit sticks.
At this stage, your biscuits are fragile. Place the entire tray into the fridge for at least an hour. You want that marshmallow to set firm before the chocolate dipping begins.
5. The Chocolate Coating
Melt your chocolate over a double boiler. Adding a small spoonful of coconut oil or vegetable oil to the melted chocolate thins it out slightly. This makes dipping much easier and creates a thinner, snappier shell.
Take your chilled, assembled biscuits out of the fridge. Balance a biscuit on a fork and dip it entirely into the melted chocolate. Tap the fork gently against the side of the bowl to let the excess chocolate drip off.
Slide the coated biscuit onto a tray lined with parchment paper. Let them set at room temperature, or pop them in the fridge if your kitchen is warm.
Common Mistakes to Avoid
Even experienced bakers can run into trouble when assembling multi-layered treats. Here are the traps you should watch out for.
Using runny jam: If your jam is too watery, it will dissolve the marshmallow and make the biscuit soggy. If your jam is thin, simmer it in a saucepan for a few minutes to reduce and thicken it before using.
Dipping warm cookies: If you rush the chilling step, the biscuit sandwich will slide apart the second it hits the warm chocolate. A firm, cold marshmallow core is non-negotiable.
Using chocolate chips for dipping: Standard baking chips contain stabilizers that prevent them from melting smoothly. Always use high-quality chocolate bars chopped into pieces for dipping.
Spreading instead of piping: Trying to spread sticky marshmallow with a knife will tear your fragile biscuits. A piping bag is the only way to get a clean, even layer.
How to Store Your Nostalgic Treats
Because of the fresh marshmallow and biscuit layers, moisture is your biggest enemy.
Store your finished wagon wheels in an airtight container in a cool, dry place. They will keep perfectly well at room temperature for up to five days.
If you live in a very hot or humid climate, keep them in the refrigerator so the chocolate does not melt. Just let them sit on the counter for ten minutes before eating so the biscuit softens slightly.
Conclusion
Recreating childhood favorites in your own kitchen brings a special kind of satisfaction. While making homemade jammy wagon wheels takes a little bit of time and patience, the result is completely worth it.
You get a treat with a buttery biscuit, a towering layer of fresh marshmallow, a bright punch of real raspberry jam, and a high-quality chocolate snap.
Grab your mixing bowl, heat up your sugar syrup, and bring a bit of nostalgia back to your snack time.
Frequently Asked Questions (FAQs)
Can I use store-bought marshmallow fluff instead of making my own?
You can, but it is not recommended. Store-bought fluff is very soft and does not set firm. Your top biscuit will likely slide off, and making it through the chocolate dipping stage will be extremely messy.
Can I make these vegetarian or vegan?
Yes. To make the marshmallow vegetarian, swap standard gelatine for agar-agar powder (you will need to follow specific agar-agar measurements as it sets firmer than gelatine). For a fully vegan version, use dairy-free butter for the biscuits, agar-agar for the marshmallow, and a dairy-free dark chocolate for dipping.
Why did my chocolate bloom (turn white and streaky) after setting?
Chocolate blooms when the cocoa butter separates. This usually happens if the chocolate gets too hot during melting or if it sets in an environment with fluctuating temperatures. Melting your chocolate slowly over a gentle double boiler helps prevent this.
Can I freeze homemade wagon wheels?
It is not recommended. Freezing and thawing changes the texture of the marshmallow, making it rubbery. The biscuit base will also absorb moisture as it thaws, leaving you with a soggy treat.